What printer settings should be used for creating digital negatives?
Many print makers ask what are the correct printer settings to use to print their digital negative. The real answer is that there is no fixed true answer. It all depends on your process, i.e. the sum of all the variables you have when printing.
Each printer – which is a variable of the process – has a set of inks and a printer driver that will give you a different print from another printer, and so a different UV filtering ability. We may certainly say that each printer combined with the printer settings and the software you use to print, plots a different UV filtering curve which means your result will be different if you change something.
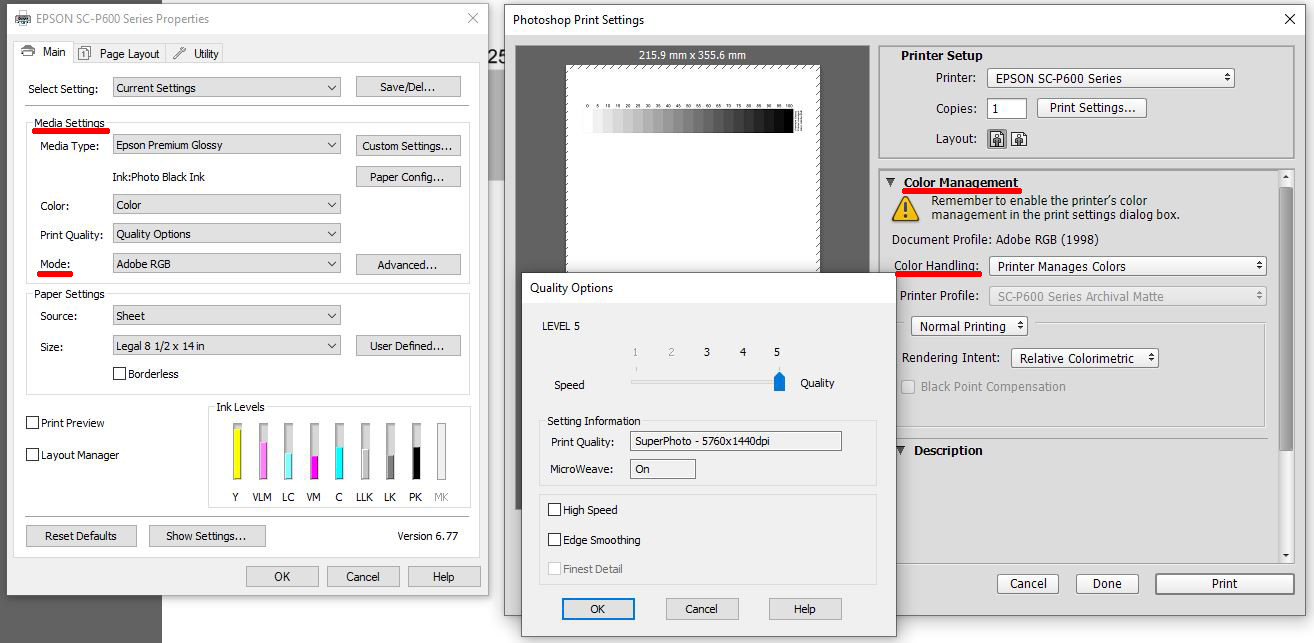
In a specific printer driver you can choose from many different settings like: the color space, the paper type, how it manages colors, etc. and each setting changes the rendition of colors in the print and so the UV filtering curve (more on that later on).
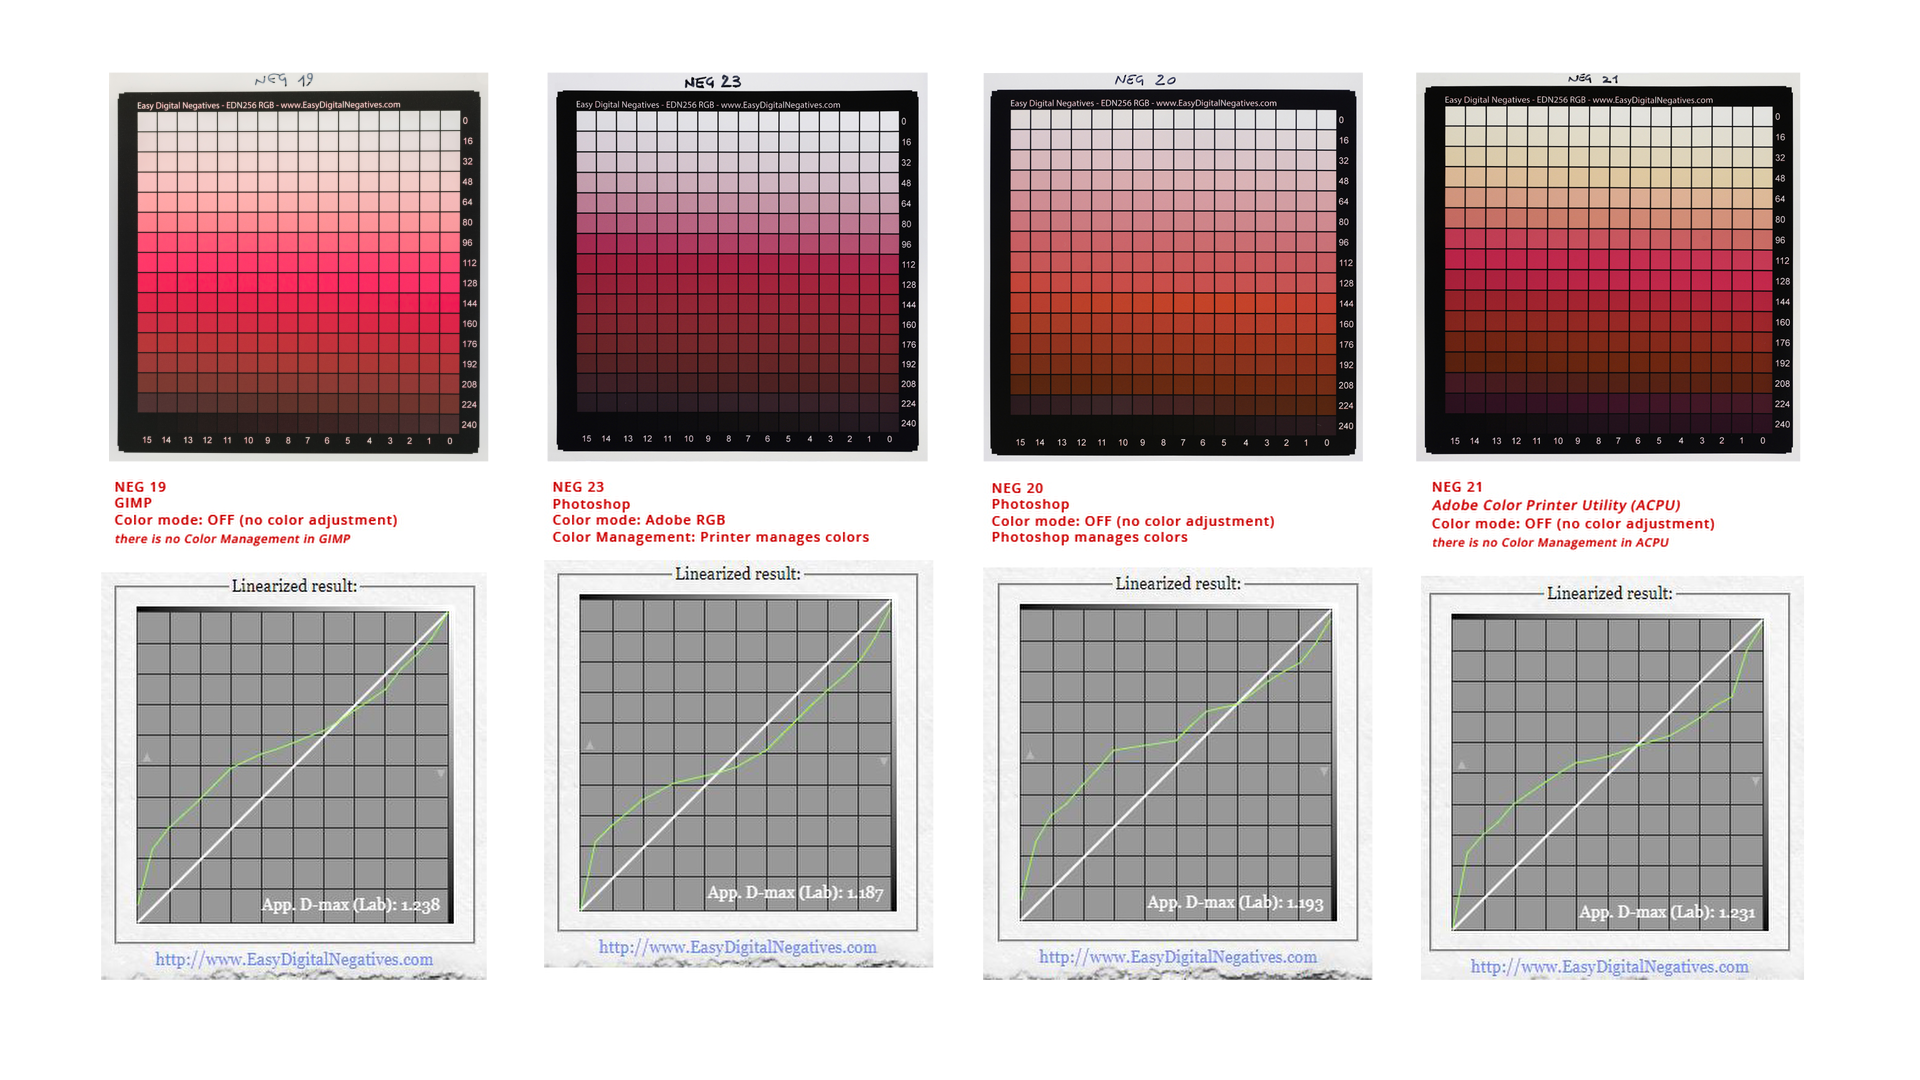
In my tests with my printer Epson P600 I used different settings in the printer driver and also used different softwares to print from (Photoshop, GIMP, Adobe Color Printer Utility) to see the differences in the final print. Each test gave me a different result.
Inside Photoshop I have printed 7 strips of a 21 grey step tablet on a transparency film, changing paper type and color management settings in the printer driver for each print, in order to see what differences in density (UV filtering) those two settings can give.
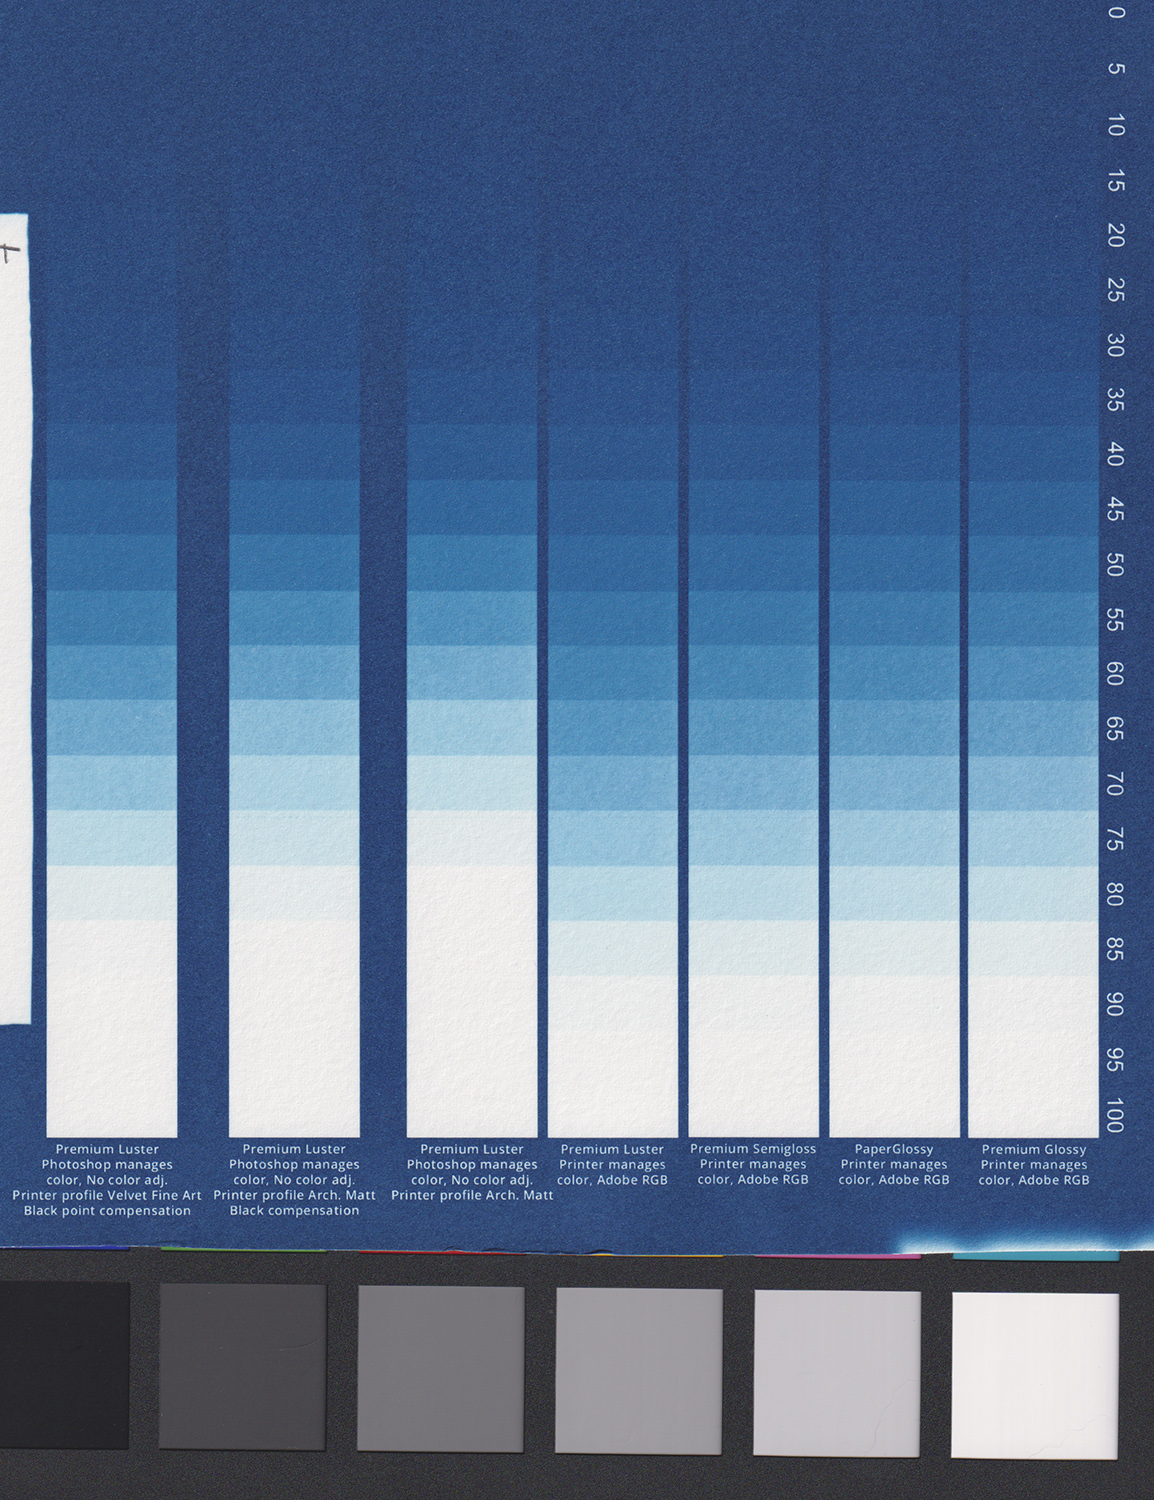
I tested different paper type setting while printing on my transparency film:
- Premium Luster
- Premium Semigloss
- Paper Glossy
- Premium Glossy
And different color management:
- Photoshop manages color
- Printer manages colors
In my test, for my process, i.e. the sum of all the variables I have, including the printer, Printer manages color wins for now together with Premium Glossy paper. My decision was taken upon several considerations including the exposure scale I wanted to get, which is related to paper white point (more on that later on).
It is a test you may need to make if you don’t have paper white in your print, or if the correction curve you get out of your test print is too strong/rough. You may be able to find out, during the calibration of your digital negative, if one or more printer settings combined make the print of your negative denser than another or the correction curve smoother, which is better. I also tested other settings inside Photoshop, like the Color Mode “Adobe RGB” or “NO color management“. Some prefer using NO color management, but for my process it is not a good choice.
The actual version of GIMP (at the moment of this writing) doesn’t allow you to choose whether “GIMP manages colors” or “Printer manages colors”, the way you can choose inside Photoshop.
Adobe Color Printer Utility (also known as ACPU) is a system used to print with NO color management. The problem I had (inside Windows operating system) is that the print was done at the upper and leftmost point of the film and I couldn’t find the way to print it more centered, nor in 1:1 scale. So, not good for me.
How to test and select the best printer settings
To find your best printer settings you need to reach the point in the calibration process where you test print the step tablet to generate the correction curve.
Before that, following what I teach in my video course Digital Negative for Alternative Photography, you need to have done the following steps in the calibration process:
- Found your Standard Exposure Time
- Found your Optimal Color Blocker
- Found paper white at the right point
- Printed the negative of a plain 256 step tablet file with your optimal color blocker on top
The best settings are the ones that give you the smoothest correction curve, given you have paper white.
As you will be able to find through experimentation, if you use EDN calibration system, is that the EDN Optimal Color Blocker helps to have a smoother correction curve because of how it is engineered.
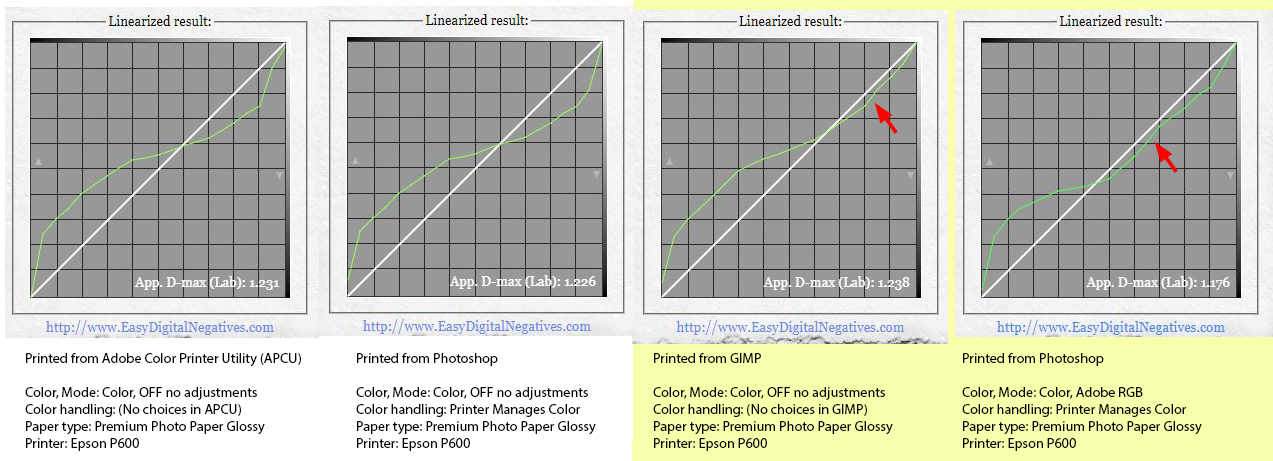
In my case the best negatives are the last two (highlighted in yellow), printed with GIMP and with Photoshop. You can notice that the correction curves are in some parts already almost linear (adjacent to the diagonal line, which is where the correction curve will have to go after the linearization).
It is not important for you to copy my settings because as I said they are right for my process (which is the sum of all my darkroom variables, not only the emulsion type I use) and so it might be better for you to do your printing tests if you want to get the best out of your calibration process.
I printed the same file using different software. It is a plain 256 step tablet with the same Optimal Color Blocker LUT on top. As you can see, the colour reproduction on the transparency film is very different, as well as the correction curve coming out from a test print made in cyanotype using those negatives.
So, if you want to go into such detail, try to have fun in these tedious tests!
Remember that it can be frustrating at the beginning but very rewarding at the end.
Always remember that the calibration process for your digital negatives needs to be performed keeping firm all your darkroom and printing variables (including the Relative Humidity, paper humidity) you have while performing your tests.
This is an external resource of the video course Digital Negative for Alternative Photography. You can read more about it in this website clicking HERE.